ブラウザから簡単にデータベースを操作することができるphpMyAdminのインストールと設定をします。
環境
CentOS 7.2.x
Apache 2.4.X
※以下、すべてroot権限で操作します。
1.EPELリポジトリの確認
さくらのVPSでは、最初からEPELが使用可能になっていますので、EPELがインストールされているか、念の為に確認します。
[root@ ~]# rpm -qa | grep epel
下記の表示が出ればインストール済みです。
epel-release-7-11.noarch
2.phpMyAdminのインストール
root権限でコンソールに下記のコマンドを入力し、Enterキーを押します。
phpMyAdminのインストールが始まり、Complete!という文字が表示されれば完了です。
[root@ ~]# yum --enablerepo=epel install -y phpMyAdmin
3.phpMyAdminの設定ファイル編集
phpMyAdminの設定ファイル /etc/httpd/conf.d/phpMyAdmin.conf を編集します。
下記コマンドで編集を始めます。
[root@ ~]# vi /etc/httpd/conf.d/phpMyAdmin.conf
下記のハイライト箇所に「Require all granted」を追記します。
この設定で外部からphpMyAdminにアクセスできるようになります。
※Apache2.2系の場合は、設定箇所が異なります。
# phpMyAdmin - Web based MySQL browser written in php
#
# Allows only localhost by default
#
# But allowing phpMyAdmin to anyone other than localhost should be considered
# dangerous unless properly secured by SSL

Alias /phpMyAdmin /usr/share/phpMyAdmin
Alias /phpmyadmin /usr/share/phpMyAdmin

<Directory /usr/share/phpMyAdmin/>
   AddDefaultCharset UTF-8

   <IfModule mod_authz_core.c>
     # Apache 2.4
     <RequireAny>
       Require ip 127.0.0.1
       Require ip ::1
       Require all granted
     </RequireAny>
   </IfModule>
   <IfModule !mod_authz_core.c>
     # Apache 2.2
     Order Deny,Allow
     Deny from All
     Allow from 127.0.0.1
     Allow from ::1
   </IfModule>
</Directory>

<Directory /usr/share/phpMyAdmin/setup/>
   <IfModule mod_authz_core.c>
     # Apache 2.4
     <RequireAny>
       Require ip 127.0.0.1
       Require ip ::1
     </RequireAny>
   </IfModule>
   <IfModule !mod_authz_core.c>
     # Apache 2.2
     Order Deny,Allow
     Deny from All
     Allow from 127.0.0.1
     Allow from ::1
   </IfModule>
</Directory>

# These directories do not require access over HTTP - taken from the original
# phpMyAdmin upstream tarball
#
Apacheを再起動して設定を反映します。
[root@ ~]# systemctl restart httpd
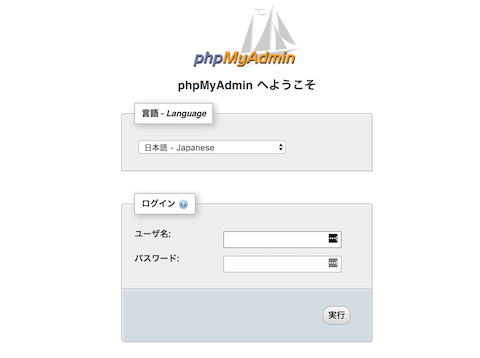
ブラウザから http://ドメイン名/phpmyadmin にアクセスしてログイン画面が表示されるか確認します。
下記のログイン画面が表示されれば初期設定は完了です。

4.phpMyAdminのセキュリティ対策
初期状態の設定では、不正アクセスに対して脆弱なため、下記のセキュリティ対策を実施してください。
第三者に推測されにくいURLに変更
初期状態のログインURL http://ドメイン名/phpmyadmin では、不正アクセスを受ける可能性が高いため、第三者に推測されにくいURLに変更します。
phpMyAdminの設定ファイル /etc/httpd/conf.d/phpMyAdmin.conf を再び編集します。
下記コマンドで編集を始めます。
[root@ ~]# vi /etc/httpd/conf.d/phpMyAdmin.conf
既に記述されているAliasに関する2行の行頭に#を追加し、無効にします。
その下に「Alias /phpmyadmin任意の英数字 /usr/share/phpMyAdmin」を追加します。
※任意の英数字部分は推測されにくいものを入力してください。
# phpMyAdmin - Web based MySQL browser written in php
#
# Allows only localhost by default
#
# But allowing phpMyAdmin to anyone other than localhost should be considered
# dangerous unless properly secured by SSL

#Alias /phpMyAdmin /usr/share/phpMyAdmin
#Alias /phpmyadmin /usr/share/phpMyAdmin
Alias /phpmyadmin任意の英数字 /usr/share/phpMyAdmin
この設定で http://ドメイン名/phpMyAdmin や
http://ドメイン名/phpmyadmin のURLからアクセスできなくなり、
http://ドメイン名/phpmyadmin任意の英数字 のURLでアクセスできるようになります。
SSLによる暗号化通信
SSLを導入している場合には、phpMyAdminへの接続はSSL通信のみ許可する設定をしてください。
phpMyAdminの設定ファイル /etc/httpd/conf.d/phpMyAdmin.conf の下記ハイライト部分に「SSLRequireSSL」を追加します。
# phpMyAdmin - Web based MySQL browser written in php
#
# Allows only localhost by default
#
# But allowing phpMyAdmin to anyone other than localhost should be considered
# dangerous unless properly secured by SSL

#Alias /phpMyAdmin /usr/share/phpMyAdmin
#Alias /phpmyadmin /usr/share/phpMyAdmin
Alias /phpmyadmin任意の英数字 /usr/share/phpMyAdmin

<Directory /usr/share/phpMyAdmin/>
   AddDefaultCharset UTF-8
   SSLRequireSSL
Apacheを再起動して設定を反映します。
[root@ ~]# systemctl restart httpd
phpMyAdminの設定は以上です。
定期的にバージョンをチェックして、最新のバージョンを使うようにしてください。
